
Table of Contents
- Can You Install Solar Power on Older Homes?
- Assessing Your Roof Before Solar Panel Installation
- Electrical System Upgrades for Solar Installation
- Government Solar Incentives and Tax Credits
- Solar Battery Storage for Older Homes
- Energy Independence and Long-Term Savings
- Special Considerations: Historic Homes and Restrictions
- Common Mistakes to Avoid When Installing Solar
Solar Power for Older Homes: A Technical Guide
Last Updated: July 23, 2026
Can You Install Solar Power on Older Homes?
Solar power for older homes is increasingly common but requires more thorough assessment than newer properties. Structural, electrical, and material compatibility challenges demand careful planning before installation.
At Solazone Australia, we’ve spent over 40 years helping homeowners navigate these exact challenges. The difference between a straightforward installation and one requiring significant upgrades comes down to understanding your home’s current state before panels arrive.
The question isn’t whether your older home can have solar power. The question is what work needs to happen first to make it safe, code-compliant, and cost-effective.
Structural integrity and roof condition assessment
Your roof is the foundation of any solar installation. Most homes built before 1980 have roof frames designed for roofing materials alone, not the additional 400-600 kilograms of a typical 6-8 kW solar system. Reinforcement often becomes necessary.
The structural inspection should assess rafter spacing and timber condition, roof pitch and load-bearing capacity, signs of water damage or rot, and previous repairs that might have weakened the frame. If inspection reveals structural concerns, reinforcement costs ($2,000-$5,000) must be factored into your total investment.
A structural engineer’s report costs $300-$600 but prevents discovering roof damage mid-installation. Skip this and you risk forced panel removal or discovering problems after installation.
Age and material compatibility
Homes built in different decades used different roofing materials, and not all work with modern solar mounting systems. Terracotta tiles (1950-1990) are brittle and crack under mounting bracket pressure. Metal roofs from the 1970s may have corrosion issues. Slate tiles require specialized mounting costing significantly more. Asphalt shingles generally work fine if in good condition.
The mounting system depends entirely on what’s beneath the brackets. Standard aluminum rail systems work on most modern roofing. Older materials often require custom solutions: tile-specific mounting brackets that distribute weight across multiple tiles, or roof penetrations sealed with materials compatible with aging surfaces.
Your installer needs to physically inspect your roof material and condition before any quote makes sense.
Assessing Your Roof Before Solar Panel Installation
Your roof condition determines whether solar works and whether it makes financial sense. A roof needing replacement in five years changes your solar investment timeline dramatically.
Roof material compatibility with mounting systems
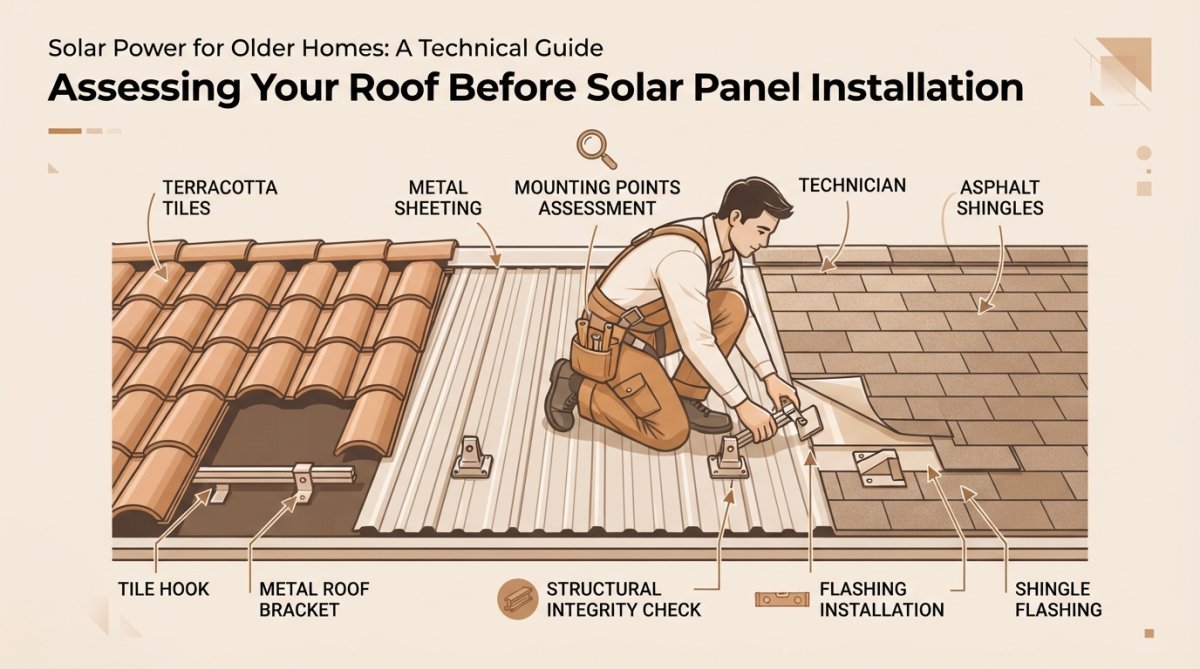
Different roofing materials require different mounting approaches.
Asphalt shingles (most common post-1980): Standard aluminum rail systems work directly. Flashing seals around penetrations easily. This is the baseline cost scenario.
Metal roofing: Mounting clamps attach to seams without penetrating the roof surface, preventing water infiltration risk.
Terracotta or concrete tiles: Tile-specific mounting brackets distribute load across multiple tiles, adding $1,500-$3,000 to installation costs.
Slate tiles: Requires specialized brackets designed not to crack tiles, with premiums of $3,000-$5,000 just for mounting.
Flat roofs: Ballasted mounting systems sit without penetrations, but require good roof condition as water pooling under panels risks damage on aging roofs.
Material compatibility assessment should happen before price quotes. If your installer quotes without inspecting actual roof material and condition, expect surprise change orders later.
Ask your installer for photos of three previous installations on the same roof material as yours. This demonstrates experience with your specific situation.
Structural inspection requirements
A structural inspection for solar is focused and specific: can your roof safely support additional weight? The inspection should include rafter size, spacing, and material; connections between rafters and walls; previous repairs or modifications; visible signs of structural movement or damage; and load calculations specific to your roof pitch and local wind/snow loads.
In Australia, wind loading is critical. A home in Townsville faces different structural demands than one in Melbourne. Your inspector should calculate combined load of your solar array plus wind forces on that array, not just panel weight.
For older homes, the inspection often reveals that the original roof frame was never designed for concentrated solar loads. Rafters spaced 600mm apart might need additional bracing. This isn’t a deal-breaker, it just means your installation budget includes reinforcement costs, typically $2,000-$5,000.
When roof replacement is necessary
Sometimes the honest answer is: your roof needs replacement before solar makes sense. If your roof is at or past its expected lifespan, replacing it first is smarter than installing solar on a roof needing replacement in three years.
Roof lifespans in Australia vary by material and climate:
- Asphalt shingles: 15-20 years
- Metal roofing: 30-50 years
- Terracotta tiles: 50+ years
- Slate tiles: 75+ years
- Concrete tiles: 20-30 years
If your roof is within 5 years of needing replacement, get a replacement quote first, then add solar to the new roof. This simplifies installation and often costs less overall.
Electrical System Upgrades for Solar Installation
Your home’s electrical system was designed for specific power consumption. Solar changes that equation, you’re now generating power, not just consuming it. Your electrical panel, wiring, and inverter need to handle this safely.
This is where many older homes encounter their biggest surprise costs. A 1970s electrical panel rated for 40-60 amps cannot accommodate a modern solar system without upgrades.
Electrical panel capacity and upgrade needs
Your electrical panel receives power from the grid and distributes it throughout your home. When you add solar, the panel must accept power from two sources: the grid and your solar array.
Most homes built before 1990 have panels rated at 40-60 amps. Modern homes typically have 100-200 amp panels. A 6 kW solar system needs at least 100 amps of capacity to operate safely alongside grid power.
If your panel is undersized, you have two options:
Panel upgrade: Replace the entire panel with a larger capacity unit, costing $1,500-$3,000 depending on location and existing wiring conditions. This is the most common solution.
Sub-panel installation: Install a second, smaller panel dedicated to solar circuits, costing $2,000-$4,000. Less common but sometimes useful if your main panel is inconveniently located.
The electrical inspection should identify current panel amperage rating, available breaker slots, grounding system condition, whether the service entrance cable can handle increased load, and age and condition of the main disconnect.
Older homes often have grounding systems not meeting current standards. A proper solar installation requires a dedicated ground rod and bonding connecting the solar array frame to ground, adding another $500-$1,000 to upgrade costs.
An undersized electrical panel is a safety hazard. Upgrading it is not optional for a compliant solar installation. Budget for this as a fixed cost.
Wiring and inverter requirements
Your solar panels generate direct current (DC). Your home runs on alternating current (AC). The inverter converts DC to AC and is the most critical component in your system.
For older homes, wiring between panels and inverter, and between inverter and electrical panel, must be sized correctly. A 6-8 kW solar system typically requires 10 mm² DC wiring from panels to inverter and 6-10 mm² AC wiring from inverter to electrical panel, with properly rated breakers and disconnects on both sides.
Most installations require new conduit runs because wall cavities and roof spaces weren’t designed with solar in mind.
The inverter comes in two main types:
String inverters ($1,500-$2,500): One inverter handles all panels. Simpler installation, lower cost. Best for roofs with minimal shading and consistent sun exposure.
Microinverters ($4,000-$6,000): One small inverter on each panel. More expensive but handles shading better and allows individual panel monitoring. Better for older homes with complex roof layouts or significant shading.
Government Solar Incentives and Tax Credits
Australia’s solar incentive landscape offers significant cost reductions. Understanding what’s available in 2026 can substantially reduce your out-of-pocket costs.
Small-scale renewable energy scheme (SRES)
The SRES is Australia’s primary solar incentive. It creates tradeable certificates (STCs) for small-scale solar installations. When you install a solar system, you generate STCs based on expected energy output over 15 years. You can sell these certificates to your installer (who passes the value on as a discount) or hold them and sell later.
For a typical 6 kW system in Sydney, you’d generate around 80-90 STCs, translating to roughly $2,000-$2,500 in value. Most installers factor this into pricing as an immediate discount.
The SRES applies to all systems up to 100 kW and is ongoing with no planned end date, though the number of STCs per kilowatt declines slightly each year.
State-based rebates and programs
Several states offer additional incentives:
New South Wales: The Helping Homes program (2024-2026) offers rebates for battery storage alongside solar, with specific income thresholds.
Victoria: Solar Homes program offers rebates for solar and battery systems with income limits.
Queensland: No additional state rebate currently, though some councils offer rates reductions.
Western Australia: Renewable energy bonus scheme offers additional incentives for systems in specific regions.
South Australia: State government rebates for battery storage when paired with solar.
These programs change frequently. Before committing to a system, check your state’s energy department website for current programs. Your installer should provide a breakdown of all applicable incentives for your location.
Income limits and eligibility criteria change. Verify eligibility before finalizing your purchase.
Solar Battery Storage for Older Homes
Solar generates power during the day. Your home consumes power 24 hours daily. Battery storage bridges that gap, but it’s expensive and adds complexity to an aging electrical system not designed for it.
Battery lifespan and maintenance considerations
Modern lithium-ion batteries last 10-15 years with proper maintenance, shorter than your solar panels (25-30 years), meaning you’ll likely replace the battery once during your system’s lifespan. Battery degradation is gradual, losing roughly 0.5-1% capacity per year.
For older homes, the maintenance consideration differs: do you have electrical infrastructure to support a battery system? Battery systems require a dedicated battery management system (BMS), proper ventilation, a separate breaker and disconnect switch, and grounding meeting current standards.
If your home’s electrical system is already stretched for solar, adding a battery might require further panel upgrades or additional wiring, adding $1,500-$3,000 to battery installation cost.
The decision about battery storage should be based on your actual power needs, not the assumption that batteries are always beneficial. If you rarely lose grid power, a battery might sit idle most of the year.
Grid-tied versus off-grid systems
Most Australian homes with solar are grid-tied: connected to the electricity network. You generate power during the day, use what you need, and send excess to the grid. At night, you draw power back from the grid. Your energy retailer credits you for exported power.
Grid-tied systems are simpler, cheaper, and more reliable than off-grid systems. You don’t need batteries or a backup generator. Installation costs are lower because you don’t need complex battery management.
Off-grid systems are only relevant for remote locations without grid access. For older homes in established suburbs or towns, off-grid doesn’t make sense.
The grid-tied approach works well for older homes because it minimizes electrical system upgrades needed.
Energy Independence and Long-Term Savings
The financial case for solar depends on three variables: your current electricity costs, your system size, and how much generated power you actually use.
Understanding ROI and payback period
Return on investment for solar is calculated as: how long until your energy savings equal your system cost?
For a typical 6 kW system costing $12,000-$15,000 (after SRES incentives), with annual energy savings of $1,200-$1,800, the payback period is 7-10 years. After that, you’re generating essentially free electricity for the remaining 15-20 year panel lifespan.
Payback period varies significantly based on your current electricity rate, your location’s solar irradiance, how much power you use during daylight hours, and whether you add battery storage (which extends payback by 2-3 years).
For older homes, the payback calculation is more complex because you might need to factor in roof repairs, electrical upgrades, or structural reinforcement. A system with a 7-year payback on a newer home might have a 10-year payback on an older home once you include these upgrades. This doesn’t make it a bad investment, it just means the timeline is longer.
Compare total cost (system plus all upgrades) against your realistic annual savings. If the payback period exceeds 12 years, either the system is oversized or your home’s upgrades are unusually expensive.
Reducing utility bills and carbon footprint
A 6 kW system in a sunny Australian location generates roughly 7,500-8,500 kWh per year. If you use 40% of that during daylight hours (typical for homes with daytime occupancy), you’re saving 3,000-3,400 kWh annually.
At current electricity rates of 25-35 cents per kWh, that’s $750-$1,200 in annual savings. Over 25 years, that’s $18,750-$30,000 in total savings, assuming rates stay constant (they typically increase 3-4% annually).
Each kWh of solar generation avoids roughly 0.8 kg of CO2 emissions. A 6 kW system eliminates about 6 tonnes of CO2 annually.
Special Considerations: Historic Homes and Restrictions
If your older home is heritage-listed or in a heritage conservation area, solar installation becomes more complicated. Heritage restrictions exist to preserve the character of historically significant properties.
Heritage protection and planning permits
Heritage listings vary by state and local council. Some require heritage approval for any external modifications, including solar panels. Others have specific guidelines about panel placement, color, or visibility from the street.
New South Wales, Victoria, Queensland, and Western Australia all have heritage protection frameworks requiring consent for modifications to heritage-listed properties. Local heritage overlays determine what’s permitted.
You might not be able to install panels on your front-facing roof because they’d be visible from the street. You might be restricted to rear or side roof placement or required to use black panels instead of standard blue.
Getting heritage approval typically adds 4-8 weeks to your project timeline and might require an architect’s drawings or heritage consultant input (cost: $500-$1,500). Check with your local council before committing to a system.
Balancing aesthetics with energy efficiency
The tension is real: the most efficient panel placement (north-facing, unobstructed, elevated) often conflicts with heritage aesthetics (panels visible from the street).
Solutions that balance both include rear roof installation (less efficient if facing south or west, but invisible from the street), integrated panels that look like regular roof tiles (much more expensive at $25,000-$35,000 for a full system), or ground-mounted systems hidden behind landscaping.
Discuss heritage restrictions with your installer before getting a quote. Some installers have experience with heritage homes and know local council preferences.
Common Mistakes to Avoid When Installing Solar
Most installation problems are planning failures that could have been prevented with better upfront assessment.
Underestimating upgrade costs
This is the number one mistake on older homes. Homeowners focus on solar panel cost and ignore the electrical panel upgrade, roof repairs, or structural reinforcement needed to make the system work.
A $12,000 system can become $18,000 once you factor in a $3,000 electrical panel upgrade, $2,000 in roof repairs, and $1,000 in additional wiring. These costs aren’t optional, they’re prerequisites for safe, code-compliant installation.
Get a full site assessment before committing. This should include a structural engineer’s report ($300-$600), electrical inspection ($200-$400), roof condition assessment (usually included with solar quote), and heritage assessment if applicable ($500-$1,500). Total pre-installation assessment cost: $1,000-$2,500. This prevents discovering mid-project that your roof needs $5,000 in repairs.
Ignoring shading and site assessment
Shading is the silent killer of solar systems. A tree casting shadow on your roof for two hours in the afternoon reduces annual energy output by 10-15%. A neighboring building shading your roof in winter might reduce annual output by 20-30%.
Many homeowners don’t account for seasonal shading changes. A tree not shading your roof in summer might cast significant shadow in winter when the sun is lower. Your shading assessment should account for trees and vegetation (including growth over time), neighboring buildings, roof structures, and seasonal sun angle changes.
Modern solar design tools can model shading precisely, but they require accurate site data. If your installer does shading assessment without physically visiting your site or using drone imagery, they’re guessing.
Choosing installers based on price alone
Solar installation quality varies enormously. The cheapest quote often reflects an installer who skipped detailed site assessment, didn’t plan for upgrades, and will hit you with change orders mid-project.
A quality installer will spend 1-2 hours on site assessing your home, provide a detailed quote breaking down panels, inverter, mounting, wiring, and labor separately, include upgrade costs if needed, provide references from previous installations on similar older homes, offer a clear timeline and communication plan, and provide comprehensive warranty (panels: 25 years, inverter: 10 years, labor: 5-10 years).
Solazone Australia’s 40+ years of experience with Australian homes means fewer surprises during installation and better long-term outcomes. When dealing with an older home’s unique challenges, that expertise matters.
Get three quotes, but choose based on which installer best understands your home’s specific situation and has experience with similar properties.
| Mistake | Impact | Prevention |
|---|---|---|
| Skipping structural inspection | Unsafe installation, roof damage, voided insurance | Budget $300-600 for engineer’s report |
| Undersized electrical panel | System won’t connect, expensive mid-project upgrade | Get electrical inspection before quote |
| Ignoring shading | 20-30% lower output, poor ROI | Model shading with drone imagery or site tools |
| Choosing by price alone | Hidden upgrade costs, poor quality work | Compare total cost and installer experience |
| Not planning for roof replacement | Expensive panel removal/reinstallation in 5 years | Check roof lifespan, replace first if needed |
Solar power for older homes is absolutely viable, but it requires more planning and assessment than newer properties. Your home’s age, roof condition, electrical system, and heritage status all influence the timeline, cost, and design of your system.
The most common regret isn’t "I installed solar", it’s "I wish I’d done a better assessment upfront." Spend the time and money on proper site evaluation. It prevents expensive surprises and ensures your system delivers the savings you’re expecting.
If you’re ready to explore solar for your older home, Solazone Australia can help. With 40+ years of experience installing systems on Australian homes of all ages, the team understands the specific challenges older properties present. They’ll conduct a thorough site assessment, identify any upgrades needed, and provide a transparent quote that includes all costs, no surprises mid-project. Get in touch for a personalized consultation that accounts for your home’s unique situation.
Frequently Asked Questions
Can you put solar panels on an old roof in Australia?
Yes, but your roof must have adequate structural integrity and remaining lifespan. Most roofs should have at least 10-15 years of life remaining before installation. A structural inspection will assess whether your roof can support the photovoltaic system's weight and wind load. If your roof is nearing the end of its life, roof replacement before solar installation is often more cost-effective than retrofitting later. Material compatibility, whether your roof is terracotta, metal, slate, or asphalt, affects mounting system selection and installation complexity.
What electrical system upgrades are needed for solar power on older homes?
Older homes often require electrical panel upgrades to accommodate a solar inverter and meet modern building codes. Your existing panel may lack capacity for the additional load. Wiring assessment is essential; older homes may have outdated or insufficient wiring that cannot safely handle the solar array's output. An electrician must verify that your electrical system can support grid-tied or off-grid operation. In some cases, you'll need a new switchboard, circuit breakers, and safety disconnects. These upgrades are critical for system safety and compliance with Australian Standards.
What government solar incentives are available for older homes in Australia?
The Small-scale Renewable Energy Scheme (SRES) provides renewable energy certificates (STCs) for eligible solar installations, reducing upfront costs. State governments offer additional rebates, Victoria's Solar Rebates, NSW's Sustainable Buildings Rebate, and Queensland's Solar Bonus Scheme vary by location. Some low-income households may qualify for DAC-SASH (Disadvantaged Communities-Solar Access and Subsidy Help) programs. Tax credits and depreciation benefits may apply to business properties. Eligibility depends on your location, income, and system size. Check your state's energy regulator website or consult with your installer about available incentives for your specific situation.
Is solar battery storage worth adding to an older home system?
Battery storage offers energy independence and protection against power cuts, but costs and lifespan must be weighed carefully. Modern batteries typically last 10-15 years with proper maintenance. For grid-tied systems, batteries are optional; you use the grid as backup. Off-grid systems require batteries for 24/7 power. If you experience frequent outages or want to maximise self-consumption of solar energy, batteries improve ROI. However, battery costs are substantial, so calculate your payback period based on your actual usage patterns and local electricity rates. A professional assessment will help determine whether battery storage aligns with your energy independence goals.
This article was written using GrandRanker