
Table of Contents
- Why Your Attic Gets So Hot and Why It Matters
- Step 1: Improve Attic Ventilation to Increase Airflow
- Step 2: Install or Upgrade Attic Insulation for Better Thermal Control
- Step 3: Add Solar Roof Ventilators for Active Heat Removal
- Step 4: Use Radiant Barriers to Reflect Heat Away
- Step 5: Seal Air Leaks and Gaps to Prevent Heat Infiltration
- Understanding Roof Ventilation Benefits for Year-Round Comfort
- Safety Considerations and When to Call a Professional
Why Your Attic Gets So Hot and Why It Matters
A hot attic is one of the biggest energy drains in any home. Without proper ventilation and insulation, your attic can reach temperatures 50°C or higher on a warm day, forcing your cooling system to work overtime and driving up electricity bills (energy.gov). A single degree reduction in attic temperature can lower cooling costs by 10-15% or more annually (peer-reviewed research). Beyond cost, excessive attic heat can warp roof materials, degrade insulation, and create moisture problems that lead to structural damage.
At Solazone Australia, we’ve spent over 40 years helping homeowners and businesses tackle this problem. The challenge is straightforward: hot air rises, gets trapped under your roof, and has nowhere to escape. That trapped heat radiates down into your living spaces, forcing your air conditioning to compensate. The good news is that several proven methods can dramatically reduce attic temperatures without requiring a complete renovation.
Step 1: Improve Attic Ventilation to Increase Airflow
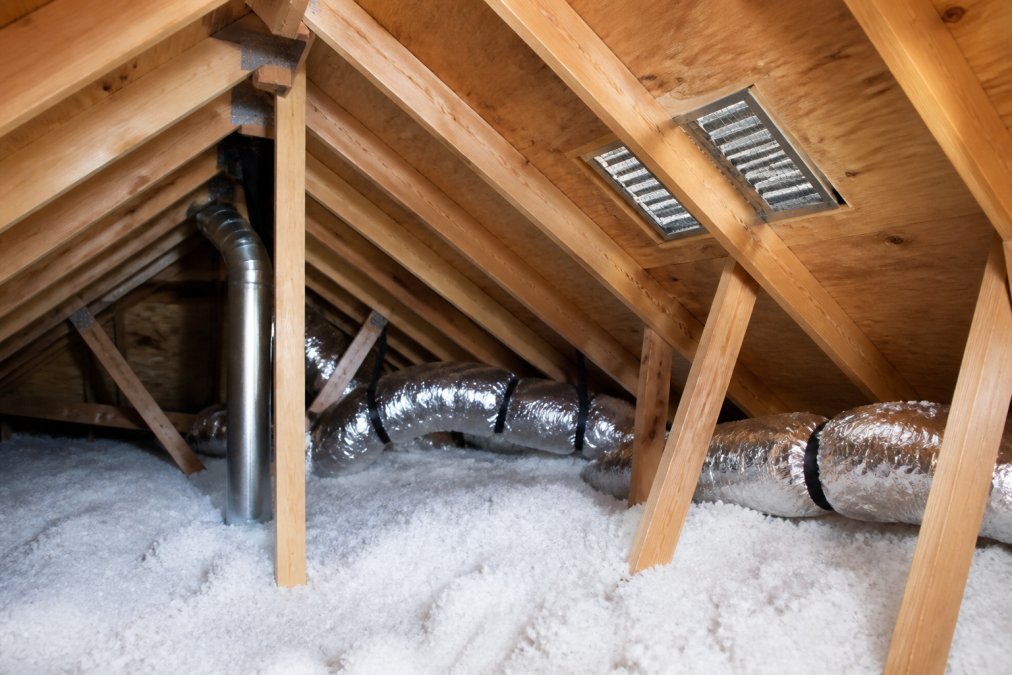
The foundation of any attic cooling strategy is proper ventilation. Airflow is the difference between a hot, stagnant space and one where heat can actually escape. Proper attic ventilation works by creating a continuous air pathway: cool air enters through soffit vents near the roof edge, rises through the attic space, and exits through ridge vents at the peak. This passive circulation, driven by natural convection, removes heat without mechanical assistance. The key is ensuring the pathway is unobstructed and balanced, you need roughly equal inlet and outlet areas for the system to function effectively.
Soffit and Ridge Vents
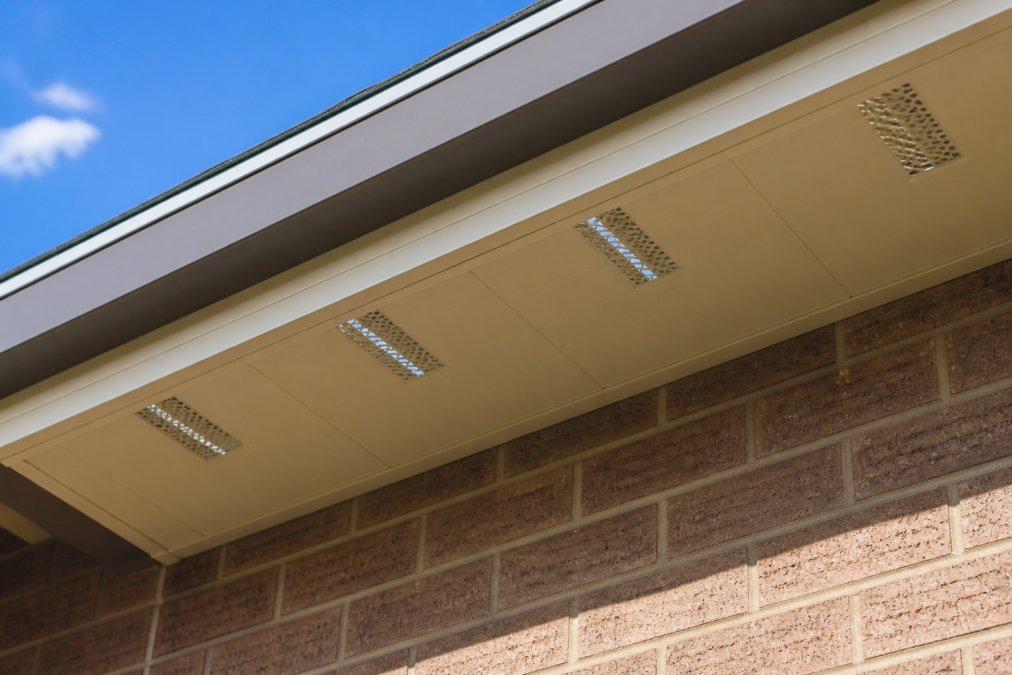
Soffit vents are your primary inlet for fresh air, running along the underside of your roof overhang. Ridge vents run along the peak and allow hot air to exit. Together, they create the backbone of passive cooling. Many homes have soffit vents blocked by insulation, painted over, or too small to provide adequate airflow. If attic insulation has been pushed against the soffit, it’s blocking air entry, a common mistake that undermines the entire ventilation system. Ensure soffit vents are clear and properly sized; a typical home needs at least 1 square metre of soffit vent area for every 150 square metres of attic space.
Ridge vents must also be clear of dust and debris. If blocked, clearing them can immediately improve heat dissipation. In some cases, adding additional ridge vent capacity makes a noticeable difference in attic temperature.
Gable Vents and Cross-Ventilation
Gable vents are the triangular vents at the end walls of many homes, providing additional exhaust points for hot air. However, gable vents alone are less effective than a soffit-and-ridge system because they rely on wind pressure rather than consistent upward heat movement. The real power comes from cross-ventilation: multiple intake and exhaust points that allow continuous air movement through the space.
A well-ventilated attic should feel like there’s a breeze moving through it. If your attic feels dead calm even on a windy day, your ventilation system isn’t working properly. This could mean blocked vents, insufficient inlet or outlet area, or a design that doesn’t create effective cross-ventilation.
Step 2: Install or Upgrade Attic Insulation for Better Thermal Control
Insulation slows heat transfer into your living spaces and helps moderate attic temperature by reducing thermal bridging. Properly installed insulation with adequate ventilation actually helps keep your attic cooler by preventing radiant heat from penetrating downward. The key is the R-value, which measures thermal resistance. In warmer climates, you typically want R-38 to R-50 in the attic, depending on your location and cooling needs (energy.gov). Insulation must be continuous; gaps and voids create thermal bridges where heat can flow directly into your home.
Checking Insulation R-Value
To know if your attic insulation is adequate, check its R-value and coverage. Read the label on insulation batts or blankets, it will clearly state the R-value. If your insulation is older or unlabelled, estimate based on depth: roughly 25 mm of fibreglass batts equals R-1. Many homes, especially older ones, have insufficient insulation. If your attic has less than R-30, upgrading will make a meaningful difference in both summer cooling and winter heating. Add additional batts or blankets on top of existing insulation, ensuring no gaps at edges or around penetrations.
Never compress insulation to fit tight spaces. Compressed insulation loses effectiveness because air pockets within the material create thermal resistance. It’s better to leave a slight gap than to crush insulation into place.
Vapour Barriers and Humidity Control
Humidity in the attic reduces insulation effectiveness and can lead to mould growth, wood rot, and structural damage. A vapour barrier, typically a thin plastic sheet, helps control moisture movement. Vapour barriers should be on the warm side of the insulation, which in summer means toward the living space below. This prevents warm, humid air from the house from migrating into the insulation where it could condense.
Humidity control also depends on ventilation. A well-ventilated attic naturally sheds moisture because air is constantly moving through the space. If your attic feels damp or shows signs of moisture, improving ventilation is often more effective than adding a vapour barrier.
Step 3: Add Solar Roof Ventilators for Active Heat Removal
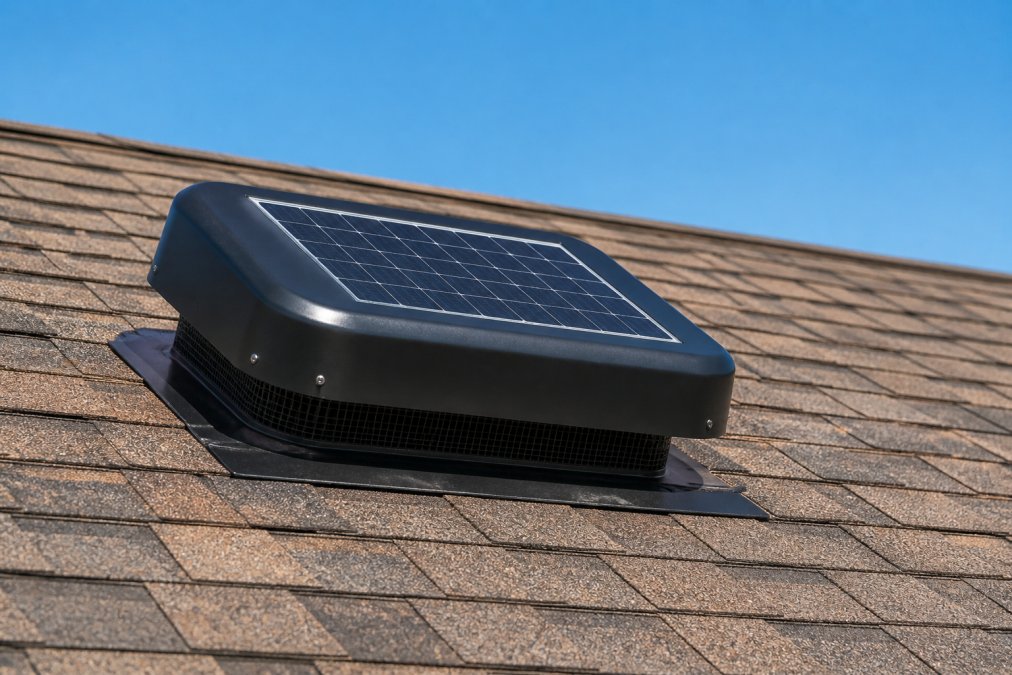
When passive ventilation isn’t enough, solar roof ventilators provide active heat removal without drawing power from your grid. These units use solar panels to power a small fan that pulls hot air directly out of the attic. They’re particularly effective in sunny climates where attic temperatures are highest during peak sun hours.
Solar ventilators work by converting sunlight into electricity to drive a fan motor. The hotter the sun, the more power the solar panel generates and the faster the fan runs, exactly when you need the most cooling. This automatic scaling makes them remarkably efficient. Unlike grid-powered fans that run on a timer or thermostat, solar ventilators ramp up cooling precisely when attic heat is at its peak.
How Solar-Powered Ventilation Works
A solar roof ventilator consists of a solar panel, fan motor, and housing that mounts to your roof. Sunlight hits the panel, generating DC electricity that powers the fan. The fan pulls hot air from the attic and exhausts it outside. Some models include a thermostat that activates the fan only when attic temperature exceeds a set point, typically 30-35°C.
Heat removal depends on the fan’s cubic metres per hour (CMH) rating. A typical solar ventilator moves 400-600 CMH, which is substantial for a residential attic. Over a 12-hour sunny day, that translates to thousands of cubic metres of hot air removed, resulting in a significant reduction in attic temperature, often 10-20°C cooler than without the ventilator.
Solazone Australia specialises in solar ventilators designed for Australian conditions. Our systems use high-efficiency solar panels and durable fan motors rated for tropical and subtropical climates. The advantage of working with a specialist is that equipment is matched to your actual sun exposure and attic volume, not a generic one-size-fits-all approach.
Installation Considerations
Installing a solar roof ventilator requires roof access and basic carpentry skills, though many homeowners opt for professional installation to ensure proper sealing and optimal placement. The ventilator needs direct sunlight for the majority of the day; shading from trees or nearby structures can reduce effectiveness.
Roof penetration must be sealed carefully to prevent leaks. The installation process involves cutting a hole through the roof, installing flashing to direct water away from the opening, and securing the ventilator housing. Professional installation is worth the investment; a poorly sealed roof penetration can cause far more damage than the ventilator saves. importance of roof ventilation.
Step 4: Use Radiant Barriers to Reflect Heat Away
A radiant barrier is a reflective material, typically aluminium foil, that reflects radiant heat rather than absorbing it. Unlike insulation, which slows heat transfer through conduction, a radiant barrier reflects heat energy before it enters your attic. Install radiant barriers on the underside of roof sheathing, facing the attic space. When the sun heats your roof, the shingles and decking radiate heat downward; a radiant barrier reflects this heat back outward, preventing it from entering the attic. The result is a measurable reduction in attic temperature, typically 5-10°C on sunny days.
The key to effectiveness is maintaining an air gap between the barrier and the roof decking. If the barrier is in direct contact with the roof, it loses much of its reflective benefit because heat has already been transferred through conduction. A 12-25 mm air gap is ideal.
Radiant barriers are particularly cost-effective when combined with insulation and ventilation. They don’t replace those measures; they complement them. Many building codes recommend using all three: ventilation to move hot air out, insulation to slow heat transfer into living spaces, and radiant barriers to reflect heat before it reaches the attic.
Installation is straightforward if your attic is accessible. The barrier is stapled to the roof rafters, creating a reflective layer facing the roof decking. Some homes benefit from radiant barriers on the attic floor as well, which reflects heat radiating from living spaces below back downward. This is less common but can be effective in very hot climates.
Step 5: Seal Air Leaks and Gaps to Prevent Heat Infiltration
Heat infiltration through cracks, gaps, and poorly sealed penetrations undermines all your other cooling efforts. If hot air can leak in through gaps around pipes, electrical conduits, or structural penetrations, your ventilation and insulation can’t do their job effectively. Common air leak points include gaps around plumbing vents, electrical conduit entries, attic access hatches, and areas where walls meet the roof.
Sealing these gaps is straightforward work. Caulk works for small cracks; for larger gaps, foam sealant or weatherstripping is more effective. Around pipes and conduits, a combination of foam and caulk creates an airtight seal. The attic access hatch is often a major leak point; adding weatherstripping and ensuring it closes tightly can make a noticeable difference.
A well-sealed attic with minimal air leakage cools more easily and maintains lower temperatures. Combined with proper ventilation and insulation, sealing air leaks can reduce cooling costs by 15-25% or more, depending on how many leaks existed before the work.
Understanding Roof Ventilation Benefits for Year-Round Comfort
Roof ventilation isn’t just about summer cooling; it’s a year-round strategy that benefits your home in multiple ways. In winter, ventilation prevents ice dams by keeping the roof surface cold and allowing moisture to escape. In summer, it removes heat before it enters your living spaces. This dual benefit makes ventilation one of the most cost-effective improvements you can make.
A dark roof can reach 65-75°C on a hot day, radiating enormous amounts of heat downward. By removing that heat through ventilation before it enters your attic, you’re preventing the problem at the source rather than trying to cool your home after heat has already penetrated. A well-ventilated attic with adequate insulation can reduce cooling costs by 20-30% compared to a poorly ventilated one. Over the life of your home, that’s tens of thousands of dollars. Beyond cost, maintaining a cooler attic extends roof lifespan, reduces strain on your air conditioning system, and creates a more comfortable home overall.
Safety Considerations and When to Call a Professional
Working in an attic carries real risks. The space is often cramped, poorly lit, and filled with insulation that can irritate skin and lungs. Roof work is inherently dangerous due to fall risk. Electrical hazards exist around wiring and fixtures.
Before entering your attic, assess the space. Is there adequate headroom and flooring? Attics with minimal joists and exposed insulation are risky to walk on. Are there signs of pest infestation or contamination? Is the attic properly ventilated for working in it?
Roof work should almost always be done by professionals. Walking on a pitched roof is inherently hazardous, especially in hot weather when shingles are soft and slippery. Installing roof vents, radiant barriers, or solar ventilators requires proper safety equipment, experience, and understanding of building codes. Electrical work in the attic should be done by a licensed electrician.
For attic improvements, handle what you can safely do yourself, sealing air leaks in accessible areas, checking insulation coverage, and ensuring vents are clear, and hire professionals for work involving roofs, electrical systems, or structural modifications. The cost of professional installation is often recovered within a year through energy savings.
Solazone Australia’s experienced installation teams are trained in attic ventilation and solar systems. We handle the technical and safety-critical work, ensuring your cooling improvements are done correctly and safely. Our 40 years of expertise means we’ve solved attic cooling problems in hundreds of homes across different climates and roof configurations.
A hot attic is a solvable problem, but it requires a systematic approach. Ventilation, insulation, active cooling, and air sealing work together to keep attic temperatures manageable and your home comfortable. Start with ventilation as the foundation. Add insulation and sealing to prevent heat infiltration. Consider solar ventilators or radiant barriers if passive cooling isn’t sufficient. The investment in these improvements pays back through lower energy bills and a more comfortable home. If you’re ready to tackle attic cooling and want expert guidance on solar ventilation systems tailored to your home’s specific needs, Solazone Australia can help you design and install a solution that actually works.
Frequently Asked Questions
Q: What is the fastest way to cool down a hot attic?
A: Solar roof ventilators provide active cooling by drawing hot air directly out of the attic space. Combined with improved soffit and ridge vents for passive airflow, they can help reduce attic temperature. For existing homes, this approach can be a quicker solution than waiting for insulation upgrades to take full effect.
Q: How much can solar roof ventilators reduce attic temperature?
A: Solar-powered ventilation systems can reduce attic temperature. The effectiveness increases when paired with adequate soffit vents and radiant barriers. Results vary based on roof orientation, shading, and how well the overall ventilation system is balanced.
Q: Is attic insulation effectiveness really important for cooling?
A: Yes. Proper insulation with adequate R-value slows heat transfer from the attic into living spaces below, reducing the cooling load on your home. Even with excellent ventilation, poor insulation allows thermal energy to pass through the ceiling, forcing air conditioning to work harder. Combining high-performance insulation with active ventilation can deliver good results.
Q: Can I install solar ventilators myself, or do I need a professional?
A: Roof work carries safety risks including falls, electrical hazards, and potential structural damage if done incorrectly. Professional installation ensures proper placement, secure mounting, and correct integration with existing ventilation. Given the height and technical requirements, hiring an experienced installer is recommended to protect both your safety and your roof warranty.
This article was written using GrandRanker